Hello everyone, I am a DIY enthusiast, we will discuss about Smarter Life / Tuya Smart Home automation apps and devices. And also linking them to Google Assistant / Amazon Alexa. Such devices as Wi-Fi plugs/sockets, switches, light-bulbs etc that do not require a hub that work with Smart Life/Tuya. Generally made by off brands but substantially cheaper then other home automation options.
* Bitte verwenden Sie keinen Strom zur Installation
* Bitte verwenden Sie keinen Strom zur Installation
* Bitte verwenden Sie keinen Strom zur Installation
Funktionsbeschreibung und Einstellmethode
* Hinweis: Für alle folgenden Arbeitsmodi müssen die QIACHIP-Fernbedienung (Sender) und die Steuerung (Empfänger / Funkfernbedienungsschalter) verwendet werden. Es gibt keine Garantie dafür, dass Fernbedienungen anderer Marken mit unseren Produkten verwendet werden können.
Reset-Funktion:
Löschen Sie alle passenden Fernbedienungen. Nach dem Löschen der Daten können alle Fernbedienungen den Empfänger nicht ordnungsgemäß funktionieren lassen.
Einstellungen zurücksetzen:
Nach achtmaligem Drücken der Lerntaste des Empfängers löscht der Empfänger alle Fernbedienungsdaten in seinem Speicher. Wenn die <LED 2> des Empfängers blinkt, ist die Rücksetzfunktion abgeschlossen.
Halten Sie nach dem erfolgreichen Pairing in diesem Modus die Fernbedienungstaste (z. B. A) gedrückt, und das entsprechende Relais am Empfänger wird eingeschaltet. Lassen Sie die Fernbedienungstaste (z. B. A) los, und das entsprechende Relais am Empfänger wird gedrückt schalte aus;
2) Schaltmodus:
Drücken Sie nach erfolgreichem Pairing in diesem Modus die Taste auf der Fernbedienung (z. B. A), um das entsprechende Relais am Empfänger einzuschalten, und drücken Sie die Taste auf der Fernbedienung (z. B. A) erneut, um das entsprechende Relais am Empfänger auszuschalten.
3) Verriegelungsmodus:
Drücken Sie nach erfolgreichem Pairing in diesem Modus die Fernbedienungstaste (z. B. A), das A-entsprechende Empfängerrelais wird eingeschaltet, drücken Sie eine andere Fernbedienungstaste (z. B. B), das A-entsprechende Relais am Empfänger ist ausgeschaltet, und das Relais am Empfänger entsprechend B öffnet. Drücken Sie die dritte Fernbedienungstaste (z. B. C), und der Empfänger schaltet sich aus. (Hinweis: In diesem Modus wird empfohlen, eine Fernbedienung mit drei oder mehr Tasten zu verwenden.)
Wie stelle ich den Arbeitsmodus der Schaltersteuerung ein?
Anmerkungen:
1. Der Arbeitsmodus kann nur eingestellt werden, wenn die Anzeige <LED 1> der Schaltersteuerung leuchtet.
2. Wenn nach dem Einschalten kein Betrieb erfolgt, leuchten <LED 1> und <LED 2> immer. Wenn sich der Schalter im Einstellzustand befindet, bleibt der Zustand von <LED 1> unverändert, und <LED 2> ist die Einstellungsstatusanzeige.
3. In der folgenden Beschreibung sind alle Beschreibungen zu LED <LED 2>.
Stellen Sie den Momentanmodus ein:
Schritt 1) Drücken Sie einmal die Lerntaste des Empfängers.
Warten Sie, bis die LED-Anzeige am Empfänger erlischt, und wechseln Sie in den Einstellzustand.
Schritt 2) Drücken Sie einmal die Taste (z. B. A) auf der Fernbedienung. Die LED-Anzeige am Empfänger blinkt und erlischt dann.
Schritt 3) Drücken Sie zu diesem Zeitpunkt eine andere Taste (z. B. B) auf derselben Fernbedienung. Die Anzeigelampe blinkt und leuchtet dann auf. Der Momentanmodus wurde erfolgreich eingestellt.
Schaltmodus einstellen:
Schritt 1) Drücken Sie zweimal die Lerntaste des Empfängers.
Warten Sie, bis die LED-Anzeige am Empfänger erlischt, und wechseln Sie in den Einstellzustand.
Schritt 2) Drücken Sie einmal die Taste (z. B. A) auf der Fernbedienung. Die LED-Anzeige am Empfänger blinkt und erlischt dann.
Schritt 3) Drücken Sie zu diesem Zeitpunkt eine andere Taste (z. B. B) auf derselben Fernbedienung. Die Anzeigelampe blinkt und leuchtet dann auf. Der Schaltmodus ist erfolgreich eingestellt.
Stellen Sie den Latch-Modus ein:
Schritt 1) Drücken Sie dreimal die Lerntaste des Empfängers.
Warten Sie, bis die LED-Anzeige am Empfänger erlischt, und wechseln Sie in den Einstellzustand.
Schritt 2) Drücken Sie einmal die Taste (z. B. A) auf der Fernbedienung. Die LED-Anzeige am Empfänger blinkt und erlischt dann.
Schritt 3) Drücken Sie zu diesem Zeitpunkt eine andere Taste (z. B. B) auf derselben Fernbedienung. Die Anzeigelampe blinkt und leuchtet dann auf. Der Latch-Modus wurde erfolgreich eingestellt.
Technische Daten
Eingangsleistung
KR2202:AC 85-220V/KR2402:DC 6-30V
HF-Frequenz
433.92MHZ or 315MHZ
Standby-Strom
8.5mA
Laden Sie Strom
1100W x2
Empfindlichkeit empfangen
-108dBM
Betriebsmodus
Momentanmodus, Schaltmodus, Sperrmodus
Spielweise
Schaltfläche "Lernen"
Remote-Typ unterstützen
Lerncode (1527)
Ausgabe
NO , NC , COM
Betriebstemperatur
-10 ~ +70°C
Größe
68*48*18(mm)
Weitere Dienstleistungen finden Sie auf unserer Website:https://www.amazon.de/stores/QIACHIP/page/5D1BC196-41B5-4D79-A3F1-9E8919579131?ref_=ast_bln
* Nota: Todos los siguientes modos de trabajo deben implementarse con el control remoto (transmisor) y el controlador (receptor / interruptor de control remoto inalámbrico) de la marca QIACHIP. No hay garantía de que los controles remotos de otras marcas funcionen correctamente.
Función de reinicio:
Borre todos los controles remotos combinados. Cuando se borran los datos, todos los controles remotos no pueden hacer que el receptor funcione.
Reiniciar la configuracion:
Después de presionar el botón de aprendizaje del receptor 8 veces, el receptor borra todos los datos del control remoto en su memoria. Cuando el LED del receptor parpadea, la función de reinicio está completa.
Halten Sie nach erfolgreichem Pairing in diesem Modus die Fernbedienungstaste (z. B. A) gedrückt. Der Gleichstrommotor dreht sich vorwärts. Lassen Sie die Fernbedienungstaste los, der Gleichstrommotor wird ausgeschaltet. Halten Sie die Fernbedienungstaste (z. B. B) gedrückt. Der Gleichstrommotor dreht sich rückwärts. Lassen Sie die Fernbedienungstaste los, der Gleichstrommotor wird ausgeschaltet.
2) Umschaltmodus:
Drücken Sie nach erfolgreichem Pairing in diesem Modus die Fernbedienungstaste (z. B. A). , Der Gleichstrommotor dreht sich vorwärts. Drücken Sie die Fernbedienungstaste erneut. Der Gleichstrommotor wird ausgeschaltet. Drücken Sie die Fernbedienungstaste (z. B. B). , Der Gleichstrommotor dreht sich rückwärts. Drücken Sie die Fernbedienungstaste erneut. Der Gleichstrommotor wird ausgeschaltet.
3) Verriegelungsmodus:
Drücken Sie nach erfolgreichem Pairing in diesem Modus die Fernbedienungstaste (z. B. A). Der Gleichstrommotor dreht sich vorwärts. Drücken Sie die andere Fernbedienungstaste (z. B. B), der Gleichstrommotor dreht sich rückwärts, drücken Sie die dritte Fernbedienungstaste (z. B. C) und der Motor schaltet sich aus. (In diesem Modus wird die Verwendung einer Fernbedienung mit mehr als drei Tasten empfohlen.)
Wie stelle ich den Arbeitsmodus der Schaltersteuerung ein?
Hinweis: Der Arbeitsmodus kann nur eingestellt werden, wenn die LED aus ist.
Momentanmodus einstellen:
Schritt 1) Drücken Sie einmal die Lerntaste des Empfängers.
Warten Sie, bis die LED am Empfänger aufleuchtet, und wechseln Sie in den Einstellzustand.
Schritt 2) Drücken Sie einmal die Taste auf der Fernbedienung (z. B. A). Die LED am Empfänger blinkt und erlischt dann.
Schritt 3) Drücken Sie zu diesem Zeitpunkt eine andere Taste (z. B. B) derselben Fernbedienung. Die Anzeige blinkt und leuchtet dann auf. Der Tippmodus ist erfolgreich eingestellt.
Umschaltmodus einstellen:
Schritt 1) Drücken Sie zweimal die Lerntaste des Empfängers.
Warten Sie, bis die LED am Empfänger aufleuchtet, und wechseln Sie in den Einstellzustand.
Schritt 2) Drücken Sie einmal die Taste auf der Fernbedienung (z. B. A). Die LED am Empfänger blinkt und erlischt dann.
Schritt 3) Drücken Sie zu diesem Zeitpunkt eine andere Taste (z. B. B) derselben Fernbedienung. Die Anzeige blinkt und leuchtet dann auf. Der Tippmodus ist erfolgreich eingestellt.
Verriegelungsmodus einstellen:
Schritt 1) Drücken Sie dreimal die Lerntaste des Empfängers.
Warten Sie, bis die LED am Empfänger aufleuchtet, und wechseln Sie in den Einstellzustand.
Schritt 2) Drücken Sie einmal die Taste auf der Fernbedienung (z. B. A). Die LED am Empfänger blinkt und erlischt dann.
Schritt 3) Drücken Sie zu diesem Zeitpunkt eine andere Taste (z. B. B) derselben Fernbedienung. Die Anzeige blinkt und leuchtet dann auf. Der Tippmodus ist erfolgreich eingestellt.
TECHNISCHE DATEN
Eingangsleistung
DC12V
HF-Frequenz
433.92MHZ or 315MHZ
Standby-Strom
8MA
Match Way
Lernknopf
Empfangsempfindlichkeit
-105dBM
Betriebsmodus
Momentanmodus, Umschaltmodus, Umschaltmodus
Remote-Typ unterstützen
Lerncode (1527)
Ausgabe
NO , NC , COM,+V,GND
Arbeitstemperatur
-10 ~ +80
Größe
35*30*18 (mm)
Weitere Dienste finden Sie auf unserer Website :https://www.amazon.de/stores/QIACHIP/page/5D1BC196-41B5-4D79-A3F1-9E8919579131?ref_=ast_bln
Smart fingerprint lock , fingerprint recognition to unlock/lock. No need to keep extra keys or remember a combination .
[Easy Operation ]: Storing 20 fingerprints (Including two administrators ) per fingerprint lock padlock, which are directly managed within your thumbprint padlock.Built-in LED light indicator for easy programming and operation. Portable and sensitive, bring to anywhere you go and lock any equipment .
[0.5 Second Unlock, Automatic Recognition Technology]: Quick-recognition technology, high security padlock support to identify your fingerprint quickly 360 degree angle. When the fingerprint lock is in empty status, you can use any finger to unlock, fingerprint is unique for you Indoor fingerprint lock are widely using for bag, drawer, suitcase, cabinet, door,also using as school Locker lock and fingerprint gym locker lock.
[ Enhanced Security and Cutting-edge fingerprint technology ]: Seamlessly designed in zinc-alloy metal body construction. Padlock outdoor for lockers prevent from being pried or smashed or cut. Fingerprint lock for locker, capacitive scanners, high penetration, excellent recognition, low misjudgment rate
The Anytek Lock Outdoor Biometric Padlock can save up to 20 different fingerprints (two primary users plus eight others) so your whole family can use it.
It's powered by a standard button battery which should last around a year - you're alerted with the power is low. You can use a directional system on the lock to enter if you need to, which is also used for the initial setup.
Naturally, it's attack-resistant with a double-lock and zinc casing, similar to the remainder of Master Lock's vast padlock range. A robust cover is designed to protect the lock against the weather.
This is the first tutorial video of our Arduino. This video mainly explains how to DIY an Arduino UNO board by yourself in 7 minutes.
Our process is divided into the following steps:
1.PCB board to the procurement of components;
2.soldering、patch and plug-in;
3. Burn Boot Loader.
The function of the Arduino UNO board is finally realized. Share this video and come back again,so guys , don't forget to like and comment. In the next video, we will teach you how to burn the Boot Loadert. thanks so much for your support! And you can join our community: https://www.reddit.com/r/Arduino_DIY/ or you can also join our facebook discussion group :"Electronic Arduino Project tutorial group", more Arduino creative teaching videos are waiting for you to discover!
Have you ever encountered that when you want to turn on the air conditioner, TV, set-top box or other remote control devices in your home, the air conditioner in your home is always missing, maybe you put it in a hidden corner, or Maybe a naughty child at home took it away, or worse, the remote control is broken. In this case, if there is a remote control that can be used by all devices, and it can be fixed in a certain position and is not easy to lose, you can use it with The mobile phone devices are connected together, and the appearance is very novel. It does not look like a remote control. You may think it is just a portable audio, power bank, or just a router. It will play a role in your home and office, quietly Stay in a corner and connect the remote control device at home with the smart device. With this device, it will greatly facilitate our lives.
This time RODOT wants to make a real universal infrared remote control. It is not as simple as the one on the market. It's not only supports remote infrared devices. What's more ,what we want to do is an interesting and versatile smart home controller.
RODOT Universal Remote Control will support infrared remote control of equipment, 433MHZ wireless remote control, and Bluetooth gateway function. It can connect most of the smart devices in the home and office, and realize a mobile phone to control all devices. You can use the RODOT Universal infrared remote control to control TVs, air conditioners, refrigerators, control lights, smart sockets, switches, air purifiers,garage doors, sweeping robots and other smart devices.
We can match the smart devices at home to the mobile phone through the universal infrared remote control, no matter when and where, we can achieve wireless control; with it, coupled with other smart home devices, we can create a more intersting and convenient family living environment.Of course, we don’t have to worry about losing the remote control anymore. In the next time, I will work with RODOT engineers to conduct a comprehensive analysis from design to purchase of materials for DIY, to successful realization of the product. Are you looking forward to it? Please join us https://www.reddit.com/r /Arduino_DIY/, let's witness the miracle moment together!
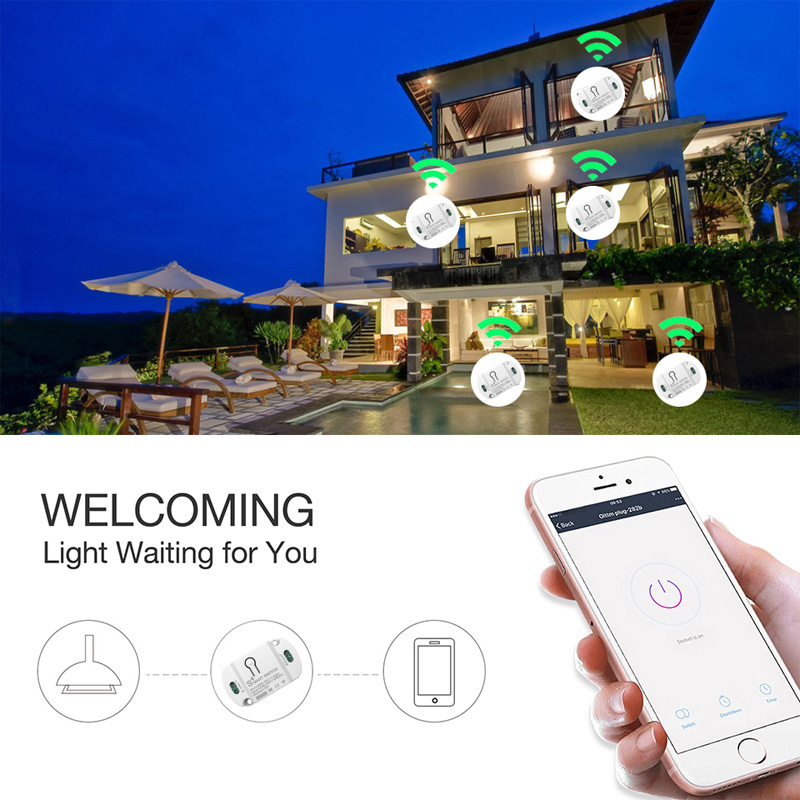
Power on the smart switch and make sure that the phone is connected to the Wi-Fi network in the 2.4GHz frequency band; turn on the phone’s Bluetooth.
Make sure that the device, mobile phone, and router are close to each other.
Download and open the App:
Search for "Smart Life" in the App Store or scan the QR code below to download and install the App;
For the first download and use, please click the "Create New Account" button to register;
If you already have an account, click the "Log in with an existing account" button.
Reset the smart switch: Press and hold the button on the smart switch for more than 6 seconds until the LED indicator on it flashes quickly.
Open the "Smart Life" APP, click the "+" in the upper right corner to enter the device addition page, and then select "Auto Scan" (please turn on the Bluetooth function of the phone before performing this operation) to start searching for nearby devices to be added. After discovering the device to be added , The icon and name of the device will appear on the APP page or a prompt page will pop up, then please follow the APP prompts to add the device
After the smart switch is successfully connected to Wi-Fi, you can see the newly added device on the home page of the Smart Life APP.
三、 How to connect to third-party applications such as Alexa and Google Assistant?
When using a third-party smart speaker to connect, you first need to download the third-party APP and register an account, such as Amazon Alexa; then add the device in the "Smart Life APP", open the device control page, click the upper right corner (see the picture below), and then Jump to the device information page, where you can change the name of the device, and you can see the details of the third-party controlled APP supported by the device, select the APP you need to connect, such as Alexa, click the icon to enter the binding interface, and then press The page prompts the operation. (see the figure below)
How to choose a smart switch suitable for making DIY products by yourself?
As we all know, there are many smart switches for making DIY series products on the market, such as SONOFF basic R2, RODOT KR2201WB smart switch. In this article, I will explain the difference between these two switches in detail, so that you can analyze it from multiple angles. And understand the performance and price advantages of each product.
1、Product appearance
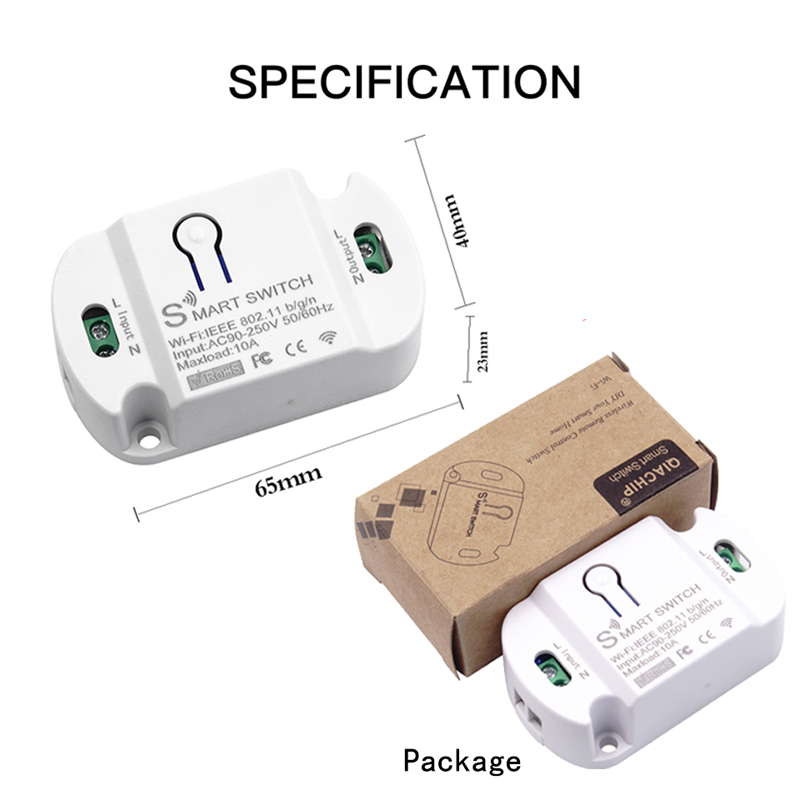
RODOT KR2201WB looks from the appearance point of view, the size is 65*40*23MM, the weight is 74g, and the size of SONOFF basic R2 is 88*38*23MM. Obviously RODOT is more portable and smart.
2、 Control method
RODOT KR2201WB smart switch has the same WIFI and voice control functions as SONOFF BASIC. For example, it supports Alexa & Google Home. The supported APPs are: IOS, Android, compatible with Nest. The current is 10A, the frequency is 2.4GHZ, and the maximum power used is 2200W. The difference is that RODOT KR2201WB is remotely controlled in Tuya smart Life APP, and it also supports Tmall Genie APP, while SONOFF BASIC needs to be controlled in EWeLink APP.
3.Certification qualification
RODOT KR2201WB has ROHS, FC, CE certification, while SONOFF only has ROHS and CE certification.
4、Synchronization status
RODOT KR2201WB is the same as SONOFF BASIC, RODOT can provide real-time device status in smart Life APP so that you can track the changes of device status.
5、Timer function
RODOT KR2201WB, like SONOFF BASIC, has timing and time setting functions to ensure that it will switch automatically within the time you specify.
6、Shared control
RODOT KR2201WB and SONOFF BASIC can share the control of home appliances with family members, so that family members can also remotely control home appliances at the same time.
7、Smart scene
Both RODOT and SONOFF can trigger one device to turn on/off another device, or group multiple devices to control them with one key.
8、Whether there is Bluetooth, WIFI connection
RODOT KR2201WB can quickly connect when there is Bluetooth, and it does not take time to find the device. When the WIFI is off, you can quickly connect the device through the mobile phone network. And SONOFF BASIC needs time to find the device. In connection time, RODOT KR2201WB saves you time.
9、DIY function
RODOT KR2201WB and SONOFF BAISIC are compatible with any household appliances at the same time (100-240V AC, maximum current 10A, maximum power 2200W). This small module has a DIY function, suitable for users with basic electrician knowledge, for teaching and people with DIY ideas.
10、Price comparison
The RODOT KR2201WB with the same function is $3.99,but the SONOFF basic is $4.85. Obviously, the RODOT KR2201WB looks good and cheap.
Welcome everyone to have better ideas for electronic DIY ideas to discuss, you can also add Riddit community ID: Arduino-DIY into the group, mutual analysis of ideas and ideas, we are here waiting for you to join.